If you want to keep your machine running at peak performance, be sure to keep these cutting blades fresh for the best cut! You will know how to Change Blade in Cricut. What blades come with the Cricut maker, types of blades, How long do Cricut blades last? How to sharpen a Cricut blade? HTVRONT cutting blades are good Cricut replacement blades.
How to change blade in Cricut?
You must replace (or sharpen) your Cricut blade regularly to keep your cut clear and complete. To do this, you need to know how to change a Cricut blade.
Every Cricut machine is loaded with a precise blade and housing combination. So depending on whether you have an Explore, Maker, or a first-generation Cricut machine, you will follow slightly different steps. So, how to change the Cricut blade? It is very simple.
Step 1: Remove the blade housing from the machine
First, you need to remove the blade housing from the Cricut. If you are using the Explore or Maker, you will need to turn on Clamp B on the dual knife holder. If you have an older model Cricut machine, you will have to unscrew the black arm that holds the cricket blade housing in place. Most users find that they can manually extract this screw.
In either case, you will need access to the cutting components inside the machine. It is always outside the plotter. Open the door on your Cricut machine; this should be the first thing you see.
After you release the clip holding the blade housing, you can slide it out.

Step 2: Carefully eject the blade!
All Fine-Point, Premium Fine-Point, Deep-Point, and Deep-Cut blade housings come with a small plunger. Gently press the plunger on the blade housing to release the Cricut blades for the maker. Make sure the blade housing is on the small collection basin or cutting pad. The blades are small, so the Cricut deep-point blade can be easily lost. Trust me; I've made this mistake many times.
Remove the blade
If you are replacing the Cricut deep point blade, you will need to place a replacement cover over the blade and housing sleeve. This element is included with your purchase of replacement blades. Place the replacement cover on the blade side of the blade housing. Hold the case tightly with one hand. At the same time, use the other hand to turn the replacement cap counterclockwise. After this, you will have to flip the case over so the Cricut blades for the maker are perpendicular to the table. The blade should slide out.
Remove the rotating blade
If you are using a rotating blade, you will need a blade replacement kit. Place the empty replacement cap over the blade and housing sleeve, then loosen the blade nut using the provided screwdriver. Do not remove old blades or washers from the cover.
Step 3: Prepare the new blade
Remove the plastic cover from the replacement blade, unless it is a knife blade or a rotary blade. These come with replacement caps. The replacement cap is designed to cover the blade at all times. This prevents craftsmen like you and me from hurting our fingers when changing blades.

Step 4: Insert the new blade
4 Ways to Change Your Cricut Blade
Installing Fine-Point, Premium Fine-Point, Deep-Point and Deep-Cut Blades Insert the new blade into the appropriate housing. If you are installing a Fine-Point, Premium Fine-Point, Deep-Point or Deep-Cut blade, grasp the cutting end firmly and gently insert it into the slot on the bottom of the blade housing. Magnets inside the housing should hold the blade in place. If the blade is installed correctly, only the tip should protrude from the end of the housing.
Install the tipped blade
If you are installing a tipped blade, place the new blade in the slot on the bottom of the case. The grooves on the blade should line up with the grooves in the housing. Replace the housing screws and tighten the replacement cover. After this, you can remove and discard the replacement cap.
Install the rotary blade
If you are replacing the rotating blade, you will need to insert the new blade into the slot on the bottom of the housing. After that, replace and tighten the housing screws that hold the black arm in place.
Remember that all blades must be paired with the appropriate housing. You can reuse your enclosures indefinitely, as long as they are not damaged or lost. Never try to use a shell that is inconsistent with your specific Cricut machine.

Step 5: Reinstall the cover
After installing the new blade, you can reinstall the case. On the Maker and Explore models, you must slide the housing into clamp B. Make sure the housing is directly on top of fixture B. Otherwise, your machine may have difficulty cutting the material. Once your blade housing is properly aligned, push down on clip B. You will need to apply a little pressure. When clamp B is properly closed, it is perfectly aligned with clamp A. For earlier Cricut models, you'll need to place the blade housing under the black tool arm and tighten the screws.

What blades come with the Cricut maker?
Not all Cricut blades are compatible with all machines. This Cricut blade chart is a great reference tool for understanding which blades are right for your machine.

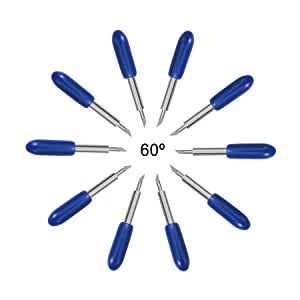
If you want to choose a Cricut replacement blade for Cricut maker blades, HTVRONT is a good choice. HTVRONT cutting blades are compatible with Cricut Explore Air/Air 2 /Maker/ Expression. There are 60 pieces of blade replacement, including 10 pieces of 30 degree blades (Yellow Cap), 30 pieces of 45 degree standard blades (Red Cap), and 20 pieces of 60 degree deep cut blades (Blue Cap).
The standard bar cutting blades are made of ground and polished high-quality stainless steel, and the fine cutting blades at the tip are carbide-treated, making these blades for cutting extremely durable and sharp enough to withstand the wear and tear of long cuts.
The tip of the Cricut replacement blade of Cricut maker blades is made of high-quality carbide, which is very sharp and durable, can cut for a long time, and is not easy to rust; the blade bar of Cricut blades for makers made of high-quality stainless steel ground and polished can withstand wear and tear, allowing you to enjoy more cutting time.

Types of Blades
30°shallow cutting blade is suitable for cutting large fonts and thin material materials such as bonded fabrics, window tint, film, and rice paper.

45° Cricut replacement blade is commonly used for general-purpose cutting of most materials, such as PU, instant stickers, vinyl, stickers, foiled cardstock, glitter paper, poster board, and computer paper.

The 60° Cricut deep-cut blade is suitable for cutting very small fonts and complex line art signs such as thick cardstock, foam board, chipboard, and some fabrics.

How long do Cricut blades last?
"When to replace Cricut blades?" This is a question that is asked a lot. The answer is a while. It's been a long time since you've cut anything crazy with your blade. There is no magic number for how many times a Cricut deep-cut blade can cut. How long do Cricut blades last?
The amount of wear on the cutting blades for Cricut determines when you need to replace them. The more you use the machine, the easier it will be for you to determine when to replace the blade. The Cricut Fine Point Blade should last 12–18 months. Daily use and cutting heavy materials can dull your blade faster. Paper and cardstock dull the blade faster than vinyl. When your blades for Cricut stop cutting well, even after cleaning and adjusting settings, it's time to replace the cutting blades for Cricut. One of the signs that it's time to replace the blade is when the blades for Cricut stop cutting material. If you've adjusted the pressure and cleaned the blade and it's still stuck or won't cut the material properly, it's time to replace the blade.
Cricut does not specify the useful life of the blades. Instead, they state the following: "Blades on a Cricut machine need to be changed at different intervals depending on the material you're using on the machine. Generally speaking, when the cut isn't brittle, it's time to change the blade."

How to sharpen Cricut blade?

Unplug your Cricut. Lift the top panel to open the device. There should be a small lever holding the blade in place. Pull it out to release the blade cartridge. Next, press the plunger on top of the blade barrel to release the blade.
Beware. Your Cricut deep-cut blade may be dull, but that doesn't mean it's not sharp enough to cut!
Next, you'll want to inspect the blade for stuck debris and residue. If it is particularly dirty, you may need to soak it in a little warm, soapy water. Wait until the blade is completely dry before proceeding to the third step.
Take a small piece of aluminum foil. Gather it into a tight ball.
Stab the Cricut blade into the foil a few times. Check out this quick video for a full demo. We recommend that you press the blade into the foil 50 or more times for the best results.


![[HTV & Sublimation Bundle] Auto Heat Press Machine 15" x 15" 110V + HTV & Sublimation & Tools Bundle](http://www.htvront.com/cdn/shop/files/21_7_385x.jpg?v=1717572544)
![[Ultimate Premium Bundle] Auto Heat Press Machine 15" x 15" 110V + 20 rolls HTV Bundle 12“x3ft + Mini 2 Heat Press Machine + Sublimation & Tools Bundle ≥ $188](http://www.htvront.com/cdn/shop/files/us_3_2bff5f82-ca66-4a1c-bb4b-e8bb9b853fbd_385x.jpg?v=1723189821)


