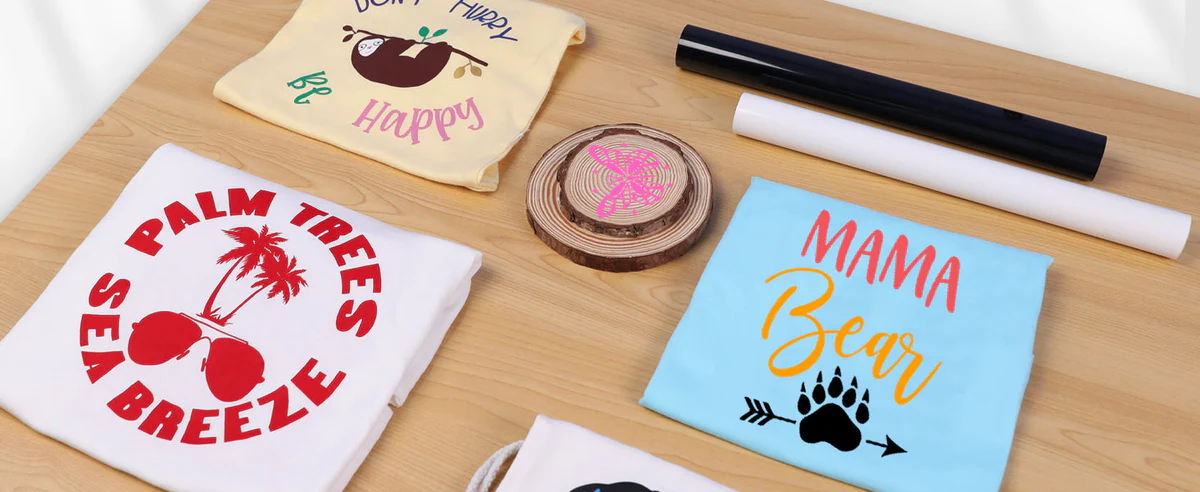
Have you ever come across those personalized shirts, tote bags, or mugs that make you think, "I could absolutely make that!"? Lucky for you, though, you can! Heat Transfer Vinyl (better known as HTV) is all you need.
Join us as we walk you through everything you need to know, from picking the right materials to mastering the tools that make it all possible.
You’ve probably wondered about the difference between PU and PVC HTV; or maybe you're curious about the magic behind making your designs stick to fabric. I’ll explain the difference between these two types of HTV later on in this guide and show you how to make your designs stick perfectly.
Don’t sweat it if you’re a total newbie—this guide is designed with you in mind. You’ll soon be creating custom pieces you’ll love with a little practice and some helpful tips. Ready? Let’s learn.
Development History of Graphic Transfer Technology
Before diving deep into HTV, let's briefly review the development history of graphic transfer technology to understand how HTV stood out from numerous techniques and became a popular choice for DIY customization today.
Background
Transfer Technology
Problem
Ordinary, customizable graphic stickers
Adhesive vinyl
Single pattern, unable to meet multi-color requirements
Using printing to meet customizable patterns and ensure rich colors
Printable Vinyl Stickers
Can only be pasted on object surfaces, cannot be worn on the body
Achieving "walking" DIY by changing the nature of the glue
Heat transfer vinyl
Single pattern, monotonous color, complex multi-color operation
Achieving unlimited clothing material DIY
Sublimation HTV
/
Film-less, printed by printer, ink embedded in fabric
Sublimation paper
Limitations on clothing materials, only applicable to cotton content ≤30%/coated substrates
Using printing to meet customizable patterns and colors
Printable HTV, Heat Transfer Paper
/
What is Heat Transfer Vinyl?
Heat Transfer Vinyl, or HTV, is a type of vinyl that sticks to fabric and other surfaces when you apply a regulated amount of heat and pressure. Instead of using glue, HTV melts slightly and bonds to the material, making it strong and long-lasting.
HTV comes in rolls or sheets and lots of styles like glossy, matte, glitter, metallic, and holographic (more on this later!). You can use it to make T-shirts, tote bags, and more. It’s pretty straightforward to use and gives your projects a clean, professional look.
Research shows that HTV usage is steadily increasing by about 5.5% to 6% every year! This is because people are continually developing a passion for creating DIY designs for their businesses, themselves, or simply to gift their loved ones.
What is HTV Made Of?
Heat transfer vinyl is made of two sides: the shiny side (carrier sheet) and the dull side (vinyl adhesive). The former holds the vinyl in place during cutting and pressing, while the latter adheres to your fabric when heat is applied. It’s the side you cut into and where your design is created.
HTV is made from two main materials: polyurethane (PU) and polyvinyl chloride (PVC) . Both are types of plastic but with different properties. PU is soft, lightweight, and flexible. PU is commonly used for clothing and other projects where you want the design to feel smooth and natural.
The latter, PVC, is thicker and more rigid. It’s great for durable designs on items like bags or workwear but it’s not as soft as PU.
Each material has its strengths, and the one you choose will depend on your project.
PU vs. PVC Heat Transfer Vinyl: Which is Better?
Here’s the big showdown: PU vs. PVC. Both types of HTV have their strengths; the one you ultimately settle for will depend on what you’re making:
PU Heat Transfer Vinyl: It’s soft, stretchy, and moves with the fabric, which is why it’s perfect for clothes. No one wants their shirt to feel stiff, right?
PU feels natural and light, and it won’t crack or peel after a few washes. So, if you’re planning to personalize some comfy tees or hoodies, PU is just what you need.
PVC Heat Transfer Vinyl: You probably want to make something that will last for the long term like bags, aprons, or work gear. In that case, PVC’s your go-to. It’s thicker and tougher than PU, which makes it great for long-lasting designs.
But, there’s a catch: it’s not as stretchy or soft, so it’s not ideal for clothing that needs to move with you. It can also feel a little stiffer.
So, bottom line, if you want something soft and stretchy for everyday wear, go with PU. If you’re after something durable for tougher projects, PVC is the winner.
We recommend that you start with PU, supposing you’re starting out as a HTV crafter. It’s easy to work with, feels great, and is perfect for getting your creative juices flowing!
How Does Heat Transfer Vinyl Work?
It’s quite simple, really. When you apply heat and pressure to HTV, it activates the adhesive on the back of the vinyl. This causes it to bond with the fabric (or whatever surface you’re pressing it onto).
The heat melts the vinyl just enough for it to stick, and once it cools down, it’s set in place. Pretty cool, right?
To make it happen though, you’ll need a heat source—either a heat press or an iron—and some pressure. This is why HTV is so reliable: the heat creates a strong, lasting bond that won’t peel off easily.
Pro Tip: Always make sure you apply the right temperature and pressure, and don’t forget to give it enough time to set. Rushing the process could cause the vinyl to lift or not stick properly.
What Does Heat Transfer Vinyl Look Like?
HTV comes in a variety of styles and finishes. Finding the perfect look for your project can either be a breeze or a nightmare, depending on your knowledge of HTV aesthetics. Here’s a deep dive into what HTV really looks like to help you make an informed decision:
Basic Colors: The classic! You’ll find HTV in all the usual colors like red, blue, black, white, and every shade in between. You can choose a single color for a clean design or mix and match for something extra.
Glitter & Metallic Finishes: Want to add some sparkle? Glitter HTV is exactly what you need. It gives your project a fun, textured look that catches the light. Metallic HTV is perfect for shiny, attention-grabbing designs. Consider it the glam squad of vinyl!
Matte & Glossy: The choice between matte and glossy finishes is a personal one. Matte gives a more subtle, sophisticated vibe, while glossy is all about that smooth, shiny look. It’s like picking between a velvet finish and a satin sheen.
Specialty HTV: There are even more exciting options out there, like holographic or flocked HTV. Holographic vinyl changes colors depending on the angle of the light, while flocked HTV has a velvety, soft texture that stands out.
Pro Tip: Think about how the material will interact with your project when picking your HTV. Glitter vinyl might be harder to cut fine details, but it’s perfect for bold statements. Matte finishes, on the other hand, work wonders for more intricate designs.
Essential Supplies for HTV Projects
You need a few must-have tools before you jump into creating custom T-shirts or bags. Obviously, you’ll need a reliable heat transfer vinyl.
Our premium HTVRONT Heat Transfer Vinyl is beginner-friendly, durable, and available in a variety of colors. You can check out the full collection here. With that out of the way, you’ll need the rest of these supplies for your HTV project:
Do you have a shirt-printing business? Or maybe you’re organizing a local event. Either way, the HTVRont auto heat press is up to the task. It does design sizes of up to 15x15 and exerts an even amount of pressure on the surface to ensure a smooth, satisfactory finish. Simply place your garment between the platens, confirm your heat press settings, and use the firm clamping mechanism to apply your design.
Vinyl Cutter or Cricut Machine
A cutting machine takes your design and cuts it out of the heat transfer vinyl for you. Popular machines like the Cricut Maker 3, Silhouette Cameo 5, or the Loklik iCraft™ are great for first-time DIYers.
I personally find the iCraft easy to use and super precise. Just connect the cutter to your computer or tablet via bluetooth, upload your design, and let the machine do the hard work.
Don’t have a cutting machine yet? You can simply use scissors or a craft knife for very simple shapes. (But trust me, a cutting machine saves so much time and effort!)
Heat Press vs. Regular Iron: What’s the Difference?
To transfer the vinyl onto your fabric, you need heat—and this is where you have two options: a heat press and a household iron.
A heat press is like an upgraded iron. It applies even heat and pressure all at once, which means your vinyl sticks perfectly without guesswork. Heat presses are faster, reliable, and reduce mistakes.
For even better results, you can use a HTVRONT Heat Press for precise temperature control and consistent results. You can explore the options available here.
Here’s the catch with a regular household iron—you need to press down evenly and hold the heat for the right amount of time. It can take a little more patience, but it gets the job done!
Just like that, you have your finished product! Heat transfer vinyl is easy to use with the relevant equipment and comprehensive information. We hope we’ve provided the latter in a way that you’ll understand and share with someone who needs it. Please get in touch with us in case of any questions about how to use heat transfer vinyl. For now, we leave you handy information about our quality HTV.
Just remember to check the temperature settings for your HTV before pressing. Too little heat and the vinyl won’t stick; too much heat and you risk burning the design.
Weeding Tools
“Weeding” sounds like something you’d do in the garden, but in vinyl crafting, it means removing the extra bits of vinyl you don’t want.
A weeding tool (it looks like a small hook) is perfect for picking out tiny pieces of vinyl, like the spaces inside letters. You can also use tweezers or even a sewing needle in a pinch.
Place a Teflon cover sheet on top of your vinyl before pressing. It stops the vinyl from sticking to the heat press or iron and keeps the heat even across your design. Teflon sheets are reusable, so you only need to buy them once.
Parchment paper works as a great backup in case you don’t have a Teflon sheet. Just don’t use wax paper—it’ll melt!
Transfer Tape: When Do You Need It?
Transfer tape isn’t always required for HTV projects, but it’s a huge help for layered or detailed designs. It generally holds all the pieces of your design in place while you move them to your fabric. Nothing shifts, and you get perfect placement every time.
I always advice beginners to start with single-layer, one-color designs. After than, please feel free to experiment with multi-layered projects using transfer tape.
Preparing to Use Heat Transfer Vinyl
Creating a design for heat transfer vinyl projects can be a lot of fun, especially when you get comfortable with the process. You have two main choices: design your own or use ready-made files.
Either way, the key is having the right tools and knowing where to find quality resources.
1. Using Design Software
Design software is where all the magic happens. It’s where you bring your ideas to life before they’re transferred onto vinyl. Over the years, I’ve worked with a few programs, and here are my go-to picks:
Cricut Design Space: It’s intuitive and packed with tools that let you customize text, shapes, and images. The built-in templates are also a lifesaver when you're short on ideas. View it.
Silhouette Studio: A solid choice for Silhouette machines. I’ve used it to create some intricate designs, and the extra flexibility it offers is fantastic. Upgrading to the Designer Edition unlocks even more features, making it worth considering. View it.
Loklik IdeaStudio: This is my favorite design software, and it’s ideal for Loklik users. The interface is clean and straightforward, but it still has enough advanced options for those bigger, more creative projects. View it.
A tip from my experience: Stick to bold, simple designs when starting out. Complicated details might look good on screen, but they can be a headache to cut and weed.
2. Finding Free and Paid SVG Files
Not in the mood to design from scratch? No problem. If you’ve spent countless hours hunting for quality SVG files, l know you’ll appreciate these fantastic resources:
Loklik Workshop is another gem for free SVG files. Our designs are creative and perfect for adding that extra touch to your projects.
For paid files, marketplaces like Etsy and Creative Market are worth a look. They offer unique, professional designs that really stand out.
Pro tip: Organize your SVG files into folders by theme. I learned this the hard way after losing track of my favorite designs. Now, everything is neatly sorted, and finding the right file takes seconds.
3. Setting Up the Cutting Machine
With your design ready, the next step is prepping your cutting machine. Here’s where precision matters, so let me walk you through it:
How to Load HTV onto a Mat
Place your heat transfer vinyl on the mat with the shiny side down. This shiny side is the carrier sheet, and it protects your design during the transfer process.
Make sure the vinyl size is good enough and is aligned properly to avoid misaligned cuts. Check out this comprehensive vinyl size chart to make sure your designs fit perfectly on T-shirts.
Do You Need to Mirror HTV?
Always mirror your design before cutting. This step ensures your final transfer is correctly oriented on your material.
Forgetting to mirror has been my most common rookie mistake; it’s such an easy thing to overlook. Double-check before hitting that cut button—it makes all the difference.
Cricut Settings for HTV
For Cricut users, choosing the right settings ensures a clean cut:
Set the material to Iron-On.
Use a fine-point blade for accurate cuts.
Opt for the StandardGrip mat to hold your vinyl in place.
Before cutting a large design, I always do a quick test cut on a small scrap piece of vinyl. It’s a great way to make sure the settings are perfect without risking your main project.
Anywho, with that said, are you ready to see your design come to life? Up next, we’ll dive into cutting and weeding—one of the most satisfying parts of the process.
Cutting and Weeding HTV
Cutting and weeding are the hands-on parts of the process where your design starts becoming real. It’s equal parts gratifying and, honestly, a little nerve-wracking at first. Don’t worry—you’ll find your rhythm, and I’ll walk you through it.
Step 1: Load Your Design and Adjust Settings
Start by opening your design in your cutting software. I used Loklik IdeaStudio for mine. Make sure the size fits your project—nobody wants to end up with a design too big for the shirt or too small for the tote bag! Adjust the cut settings based on the type of HTV you’re using.
Here’s a tip: take a moment to check your cutting mat. Dusty, gunky mats can mess up the vinyl's placement. Also, dull blades can cause jagged cuts. I’ve learned to keep spares around because you never know when your blade will decide to quit on you.
Step 2: Perform a Test Cut for Accuracy
Before diving into your main piece, do a quick test cut on a scrap. Pick a simple shape, like a triangle, and let the machine cut it. This small step ensures you’re cutting just the vinyl—not the clear backing it’s attached to.
I’ve skipped this before, thinking, Eh, it’ll be fine. Spoiler: it wasn’t fine. You wouldn’t want to waste an entire sheet of vinyl because the blade went rogue. Keep a little stash of scraps for moments like these—it’s a great way to use them up and avoid any major setbacks.
Step 3: Cut the Vinyl and Weed Excess Material
Once your test cut looks good, mirror it or flip it horizontally. Place your HTV shiny side down on the mat, load it into the cutter, and let the machine do its thing. After cutting, remove the vinyl and start weeding.
As we’ve already established, weeding is basically peeling away everything you don’t want in your design. I like to start from the corners and work inward. Having a proper weeding tool is more than necessary.
Good lighting is your best friend. Move your vinyl under a light source to make those faint cut lines easier to see.
Keep some painter’s tape or a lint roller handy. It’s perfect for grabbing all the little scraps that would otherwise end up on your floor, clothes, or worse—stuck to your project.
For extra-fine details, warm the vinyl slightly. A quick blast from a hairdryer loosens it up and makes it easier to work with.
Here are some other pro tips for weeding vinyl:
On that note, it’s also best to keep in mind these common weeding mistakes so you can avoid them at all costs:
Rushing through it: Weeding can be tedious, but speeding up can lead to torn designs or missed pieces. Take your time.
Throwing away too soon: I’ve accidentally tossed tiny pieces that were supposed to stay on my design. Now, I double-check the scrap pile before binning it.
Fighting stubborn vinyl: Stop and check your cut settings if the vinyl isn’t weeding easily. The cut might not have gone deep enough, which happens to everyone at some point.
Weeding might test your patience, but it’s all worth it when your design starts coming to life. All good on that front Great! Next, let’s get into the fun part—pressing your masterpiece!
Applying Heat Transfer Vinyl
Applying HTV might feel like the final step, but it requires a little finesse to make sure everything sticks perfectly. Let's walk through how to apply your vinyl like a pro, using different methods that’ll suit your needs.
Method 1. Use HTV with HTVRONT Heat Press
Using a heat press is by far the easiest and most reliable way to apply HTV. It's designed to give you an even, consistent heat distribution, which makes sure your vinyl sticks without any hot spots or wrinkles.
Just set the temperature, preheat your surface for a few seconds, then place your design and press down.
The HTVRONT Auto Heat Press 2 takes a lot of the guesswork out of pressing. With automatic pressure control, it’s super easy to get consistent results without having to adjust things constantly. It’s a solid choice if you want to make the process smoother and a little less hands-on.
Here’s a short tutorial to help you learn how to use the Auto Heat Press 2:
The HTVRONT Mini3 Heat Press is your go-to for smaller, more intricate items. It's super portable, giving you the freedom to press everything from shirts to accessories with a little extra precision. Watch the following tutorial video:
What I love about these heat presses is how quickly they work. In about 10–15 seconds, you’ll have a flawless design ready to go. Plus, the even pressure ensures it won’t peel off over time. It's a game changer for making sure your designs last.
Method 2: Use HTV with a Regular Home Iron
Using an iron isn’t quite as smooth as a heat press, but it can still work well—especially for smaller projects. Set your iron to its highest setting (no steam!), and press down firmly for 15–30 seconds.
I like to use a Teflon sheet or parchment paper between the iron and the HTV to protect the vinyl from direct heat. This method takes a bit more patience since you need to apply even pressure over your design.
I recommend moving the iron around to cover all areas, rather than just holding it in one spot. It's definitely doable, but it’s a little more hands-on than a heat press.
Method 3: No Any Machine
You can still apply HTV using a good old-fashioned household item—like a hairdryer or even your stove.
While it’s not the most traditional route, it works in a pinch for small designs or quick fixes. Simply heat up the HTV with the hairdryer for a few seconds, then press it onto your surface using firm pressure.
I use this trick when I’m far away from my heat press or I just didn’t want to fire it up for a small project. It’s worth a try if you’re feeling adventurous and need something fast.
HTVRONT Heat Transfer Vinyl: Temperature and Time Guidelines
You’ll want to set your heat press or iron to around 290°F (143°C) when using HTVRONT HTV. Apply even pressure to the vinyl for about 10–15 seconds, then peel it off while it’s still warm (except for cold peel HTV, of course).
If you’re using an iron, the general rule is the same—just make sure it’s hot and press down firmly, but avoid going too hot or leaving it on too long. Overheating can damage the vinyl or make it peel after washing.
For general reference, the following table lists the common temperature and time parameters for various heat transfer materials. These parameters are not limited to HTVRONT products, but rather serve as a guideline for most similar materials:
Product
Parameter
Heat Transfer Vinyl
145-155°C, 15-20s
Heat Transfer Paper
160-165 °C, 15-20s
DTF Film
150-160°C, 15-20s
Sublimation Paper
180-200℃, 40-50s
Sublimation HTV
150°C, 15-20s 180-200°C, 40-50s
How to Avoid Peeling: Proper Pressing Techniques
A little too much pressure or not enough time can make your design peel off. Please make sure to apply consistent and even pressure as you press the garment.
Move the heat press or iron slowly over the entire design—don't rush it! It might seem like a small detail, but it makes all the difference. Also, remember to let the vinyl cool down before peeling it off.
Too hot and it might pull away from the fabric, leaving you with a design that just won't stick.
Taking the time to get it right ensures your design stays put, no matter how many washes it goes through. With practice, you’ll get the hang of the right amount of heat and pressure to make sure everything sticks perfectly every time.
HTV Project Ideas and Applications
It’s understandable if you don’t have a clear project in mind just yet. Sometimes, the fun of HTV comes from discovering new things you can make once you’ve got the basics down. Here are a couple of ideas to help you in your creative journey.
HTV for T-Shirts and Apparel
You can make personalized shirts for family events, create branded merch, or just add a little flair to a plain old tee using heat transfer vinyl.
One thing I’ve learned over time is that the sky’s the limit with what you can create. Quotes, logos, fun patterns, or custom designs—all you need is a design, some HTV, and your press or iron.
HTV is a fantastic way to start your own T-shirt business if you're feeling entrepreneurial. Learn how to launch your own venture with heat transfer vinyl by reading this helpful guide on starting a T-shirt business.
Pro tip: Keep in mind the fabric you’re using. Cotton? Great. Polyester? You might need a different type of HTV to get that design to stick perfectly.
Using HTV on Wood, Glass, and Non-Fabric Materials
I’ve worked on a few projects where I used HTV on wood—think cute home signs or decorative trays—and let me tell you, it’s way easier than it sounds. Just remember to prep your surface, especially if it’s a porous material.
A little sanding goes a long way to make sure the vinyl sticks for good. Glass can be a bit trickier, but it’s totally doable with a heat press or a reliable iron. The key is getting the right temperature and time down to avoid peeling.
Layering Heat Transfer Vinyl for Multi-Color Designs
Layering HTV is somewhat similar to creating a little piece of art—each layer adds something special to your design. You can stack different colors to make a design pop, or add details to an already bold graphic to really make it stand out.
Here’s the thing with layering: you need to press each layer individually, one at a time. It’s a bit more time-consuming, but the end result is so worth it. I usually press each color for about 5–10 seconds, let it cool, then peel it off before adding the next layer.
The trick is making sure each layer sticks properly without shifting or bubbling. Sure, it will take a bit of practice, but it’s totally worth the effort when you see your masterpiece come together. Read this article to learn the ropes of layering HTV.
Now that we’ve covered the basics, the possibilities are endless. HTV can bring any project to life in a fun, easy way. All it takes is a little creativity and the right tools, and you’ll be creating custom designs in no time.
Troubleshooting Common HTV Problems
Things don’t always go perfectly when you’re working with HTV, and that’s completely okay! Most of the time, little issues can be solved with just a few adjustments. Here are some of the most common HTV hiccups and how you can fix them so your projects come out just the way you want.
Why is My HTV Peeling?
Nothing more annoying than seeing your design peel off after you’ve put all that work in, right?
More often than not, this happens when you didn’t apply enough pressure or let it cool properly. Make sure you’re pressing with even and firm pressure. Give it some time to cool before peeling then thank yourself later when the design sticks.🙂
Why Won’t HTV Stick to the Fabric?
It’s usually because the heat settings or fabric type are a little off. Fabrics like nylon or polyester need higher heat to really bond.
First off, make sure your heat press is set to the right temperature. Second, get rid of all the moisture or wrinkles on the fabric before you start. A little attention to detail here can save you from redoing the whole thing.
How Long Does HTV Last on Clothing?
A well-applied HTV design should last for years. The key to longevity is using the right temperature and pressure when applying the vinyl.
It also wouldn’t hurt to treat your garment well; wash it inside out in cold water, and avoid the dryer’s high heat. And that, dear reader, is how you can enjoy your custom designs for a long time without them fading or peeling.
On the other hand, maybe you have an unwanted logo or design. Don’t worry, you can remove heat transfer vinyl from a T-shirt with the right technique. Click on this helpful article on removing logos.
Why Is My HTV Not Laying Flat After Pressing?
That’s because the pressure wasn’t even across the entire design. A quick fix? Press it again for a few more seconds, this time making sure everything’s covered. It also helps to keep an eye on the seams or thick fabric areas—those can sometimes throw things off.
Why Does My HTV Have Bubbles Underneath?
Bubbles pop up when there’s too much moisture or heat trapped under the vinyl. The best way to prevent them is to avoid using steam with your iron.
But wait - there’s a chance they might sneak in anyway. When that happens, gently pop them with a needle and then re-press the design to seal it down smooth. Problem solved!
Advanced Tips for HTV Success
Congratulations! You’re officially part of the vinyl club now, and it’s time to kick things up a notch. These advanced tips aren’t just for showing off (although that’s a perk). They’re here to make your HTV projects smoother, faster, and way more satisfying. Let’s get into it!
1. Using Transfer Tape with HTV
Imagine trying to piece together a detailed design—tiny letters, swirls, or shapes that refuse to stay put. Frustrating, right? That’s where transfer tape swoops in to save the day.
Here’s how I like to roll: stick the transfer tape over your design (shiny side down) before you press. Everything stays exactly where you want it—no sliding, no drama. Once it’s pressed, peel the tape away, and voilà! Your design is flawless.
A quick tip? Go for a low-tack transfer tape so it doesn’t stick too aggressively. It’s a small trick that makes a huge difference.
2. How to Use a Heated Weeding Panel?
Think of the heated weeding panel like giving your vinyl a little spa day. The gentle heat from the wide panel softens the adhesive backing, so peeling off those tiny pieces becomes ridiculously easy.
When I first tried this, I couldn’t believe I’d been weeding the hard way for so long. Start with a low heat setting and adjust until you find the sweet spot for your vinyl.
Just don’t go overboard, or you’ll end up with curling edges. It’s one of those tools you don’t realize you need until you try it, and then there’s no going back.
3. Creating Custom HTV Designs by Hand
Drawing your own design by hand is a fun way to add personality to your projects. Grab a pencil, sketch out your idea, and then digitize it using Loklik IdeaStudio or whatever software you’re into.
Here’s a little insider tip: bold lines and simple shapes work best, especially for beginners. I once hand-drew a funky geometric pattern for a tote bag, and it came out way cooler than I expected. Plus, it’s one-of-a-kind—you can’t find that in any SVG shop!
Heat Transfer Vinyl Frequently Asked Questions
1. How do I choose the right vinyl size for different shirt designs?
For adult shirts, 10-12 inches wide is usually spot-on, while kids’ shirts look best with designs around 6-8 inches wide. Grab a ruler or just lay out your design on the shirt beforehand to double-check—it’s worth the extra minute!
2. How can I ensure my HTV designs fit perfectly on kids' shirts versus adult sizes?
For kids’ shirts, keep the design proportional to the chest area and adjust the placement slightly higher for balance. Adult sizes? A quick measure and a centered placement about 2 inches below the neckline always does the trick.
3. What are the best practices for layering HTV on multi-color designs?
Layering isn’t hard, but you need a system. Press the first layer for a few seconds—just enough to stick—then add the next layers one at a time. Use Teflon sheets or parchment paper to keep everything smooth and avoid scorching.
4. Are there specific fabrics that make layering HTV easier?
Cotton and cotton blends are your best friends when layering. They don’t stretch or bunch, which keeps your design neat. Avoid materials like spandex unless you’re looking for a challenge (spoiler: you’re probably not).
5. What tools can help avoid mistakes when aligning multiple layers of vinyl?
Honestly, a good ruler and heat-resistant tape go a long way. If you want to level up, laser guides are amazing for pinpoint accuracy. Pro tip: Add registration marks in your design software to keep everything perfectly lined up before you cut.
6. How do I properly remove an existing logo from a shirt to replace it with my own HTV design?
Heat up the old logo with an iron or heat press to loosen it. Peel it off carefully using tweezers or a scraper. Any leftover adhesive? Rub it away with alcohol or an adhesive remover—but always test on a hidden area first, just in case.
7. What’s the easiest way to cleanly remove HTV mistakes from a shirt without damaging the fabric?
Nobody likes mistakes, but they happen! Apply heat to soften the vinyl, then peel it off with weeding tools or your fingers. Use a product like AlbaChem Vinyl Letter Remover for stubborn bits—it’s a lifesaver and gentle on fabrics.
8. What are the key steps to starting a small t-shirt business with heat transfer vinyl?
Get a good cutting machine, a reliable heat press, and high-quality HTV. Practice on different fabrics then create some eye-catching designs. When you’re ready, set up shop online—platforms like Etsy and Instagram are fantastic for showing off your work!
9. Which vinyl types are most durable for t-shirt businesses aiming for long-lasting designs?
PU vinyl is the go-to choice for durability. It’s stretchy, soft, and holds up great in the wash. Your customers will love it because their shirts look fresh even after a ton of laundry days.
10. Can I reuse leftover pieces of HTV for future projects?
Absolutely! Those scraps are gold. Use them for smaller designs like monograms or logos. They’re also perfect for test cuts when you’re working on new projects. Keep them organized by color, and you’ll be surprised how much you can save.
Bottom Line
Congrats—you’re all set to start crafting with heat transfer vinyl! By now, you’ve learned the key steps: choosing and designing your cut file, adjusting your settings, and getting that perfect press. Testing your settings and weeding carefully is key to smooth, flawless designs. Mistakes? They happen, but they’re part of the process, and you’ll only get better!
Now it’s time to take the leap and start creating! The best part? The more you practice, the more confident you’ll feel. With HTVRONT heat transfer vinyl, you’ll get fantastic results every time. Whether it’s shirts, totes, or more, HTVRONT vinyl is the perfect way to get started. Happy crafting!
To improve our service quality, we value your shopping experience at HTVRONT official website and your
willingness to recommend us to others. Please take a few moments to complete this survey.Your opinions are
important
to us. Thank you for your participation and support!
Would you recommend HTVRONT to others?(1-10)
Very UnwillingVery Willing
Please rate the HTVRONT services. (1: very dissatisfied, 10: very satisfied)


 Grab a Special Deal!
![[Special Price] HTVRONT Manual Heat Press Machine 15" x 15" 110V](http://www.htvront.com/cdn/shop/files/1_4494b0b3-7850-46ef-bb21-f9930ae89f10_355x.png?v=1741145155)


![[Easter Offer] Auto Tumbler Heat Press Machine 120V +Super Valued Bundle(30pcs Sublimation Paper+6pack Sublimation Mugs Blank-11oz+4Pack Glass 16oz+4Pack Tumbler Blank- 20oz+Sublimation HTV*5+Sticker Paper*20+Glitter Rainbow Adhesive Roll≥$168)](http://www.htvront.com/cdn/shop/files/Auto2_22_355x.jpg?v=1742541372)
![[All in one kit]HTVRONT Auto heat press 2+Tumbler press+Hat Press+All in One Bundle(Including Multicolor HTV Roll*20,Sublimation Paper A4,Sublimation HTV,PUFF HTV,T shirt Ruler,Tumbler Blanks,Blank Hat Blanks,Teflon Sheet, Heat Tape,Weeding Tools)](http://www.htvront.com/cdn/shop/files/Auto2_Tumbler_Hat_4-1_355x.jpg?v=1744018782)

![[Buy Hat get Free Hat Heat Press Machine]10Pack Baseball Cap Blanks Bundle / 15 Pack Sponge Trucker Cap Blanks Bundle / 12 Pack Thermal Winter Ski Mask Blanks Bundle,for school/party/office/outdoors/St. Patrick's Day Deals](http://www.htvront.com/cdn/shop/files/20240424-112438_355x.jpg?v=1744687480)
![[HTV Basic Kit] HTV Vinyl & Basic Tools Bundle (17 pcs)](http://www.htvront.com/cdn/shop/files/img_v3_02gj_3a5efb75-0884-46dc-8f11-2d07334a6f1g_355x.jpg?v=1731489933)